In order to obtain the actual value of this quality index, the type, quality, size and quantity of the impurity particles are collected from the specified parts by a prescribed method. The specified part referred to here refers to the specific part that jeopardizes the reliability of the product. The impurities include all impurities left in the product design, manufacturing, transportation, use and maintenance, which are left by the outside, mixed with the outside and generated by the system.
Enlightenment from engine defects
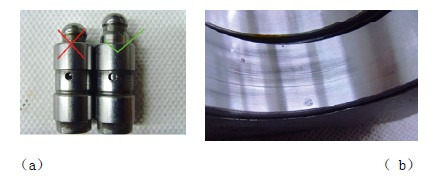
In recent years, with the concern of quality concept and quality consciousness, especially the safety and reliability of car products, as well as the higher requirements for environmental protection and energy saving, the quality monitoring of cleanliness is highly valued. . Faults and defects caused by cleanliness problems have appeared in the past, but the degree of attention is not enough, especially for powertrain components such as pumps, oil pumps, engines and transmissions. Typical examples are the defects that cause abnormal noise in car engines. The exploration of the reasons. With the continuous strengthening of consumers' self-protection awareness, as well as the market commitment of enterprises and the improvement of product responsibility, such defects that have been neglected in the past have also been taken seriously. The engine was analyzed and it was found that the rocker could not be lifted due to the hydraulic tappet being stuck, causing a gap between the roller and the cam on the rocker arm (see Figure 1a). The stuck component was due to the cooperation with the crankshaft main journal. The upper and lower two bearing bushes are mixed with solid granular debris, which not only pulls the surface of the bearing pad (see Figure 1b), but also causes abnormal noise. Further disassembly analysis also showed that the seizure of the hydraulic tappet was also caused by the mixing of fine aluminum scrap particles in the mating surface clearance. Tracing back to the source is due to the lack of cleanliness of the assembly or parts, which shows the importance of product cleanliness.

Figure 1 The hydraulic tappet and the bearing bush that cause abnormal noise and the aluminum scrap particles mixed in the mating surface
Improvement and implementation of cleanliness indicators
It is known from the meaning of cleanliness that the quantitative expression of this mass characteristic value is necessarily related to the amount of impurities carried by the product, that is, the amount of residue. For many years, the cleanliness has indeed been based on the weight of the residue, and the impurities weighed are mainly metal solid particles.
1. Improve the control requirements of cleanliness indicators
As a major indicator, the control value of the amount of residue after cleaning in the workpiece has been significantly improved in recent years. For example, the main parts of a brand of small displacement engines, cylinders, cylinder heads, crankshafts, camshafts and The indicator of the connecting rod has been compressed by 40% to 100%, which is closely related to the demand for product quality and the development of engine product technology. On the other hand, in order to make the results obtained after the cleanliness test truly reflect the condition of the product, and also to make the test results of the enterprises more comparable, the quality of the equipment used in the first extraction process of the test work It is also improving, and its cleaning area has been changed from the traditional open pool type to the sealing area, which avoids the splash of washing liquid generated by the operation and the reduction of the flushing pressure. Some cleanliness test equipment also comes with an automatic regeneration device that not only ensures that the expensive cleaning fluid is continuously and reliably reused, but also is more environmentally friendly. It is also because the cleaning pressure test can effectively guarantee the parameters such as the flushing pressure of 2.5?3.0bar (1bar=105Pa), which makes the test result more credible.
2. Increase evaluation items
The product cleanliness index has been increased from the original single residue quality, which puts more stringent requirements on the cleanliness of the product.
(1) The maximum particle size of the residue is only an option before, but it has become a compulsory inspection project. The key is to establish corresponding standards, so that there is a basis for discrimination. There are a variety of corresponding detection methods. In addition to the traditional optical microscope, there are also stereo microscopes, metallographic microscopes, or more advanced special cleanliness analysis systems.
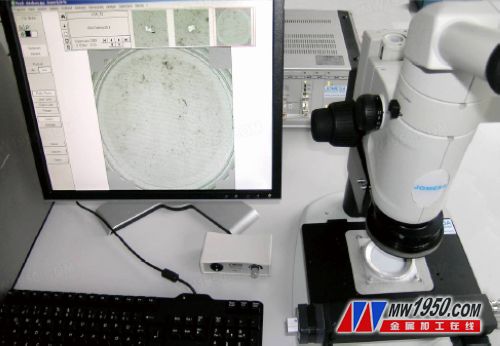
(2) Physical Properties of Residues The bodies of the residues mentioned above are solid metal particles, which have the greatest influence on the product. But in fact there will always be some non-metallic residues, such as oil, fiber and so on. Some enterprise groups have also set the maximum fiber length index, but most mainstream engine manufacturers are still more concerned about the hazards of metal particles, requiring that the residue should not contain aluminum particles. The cleaning method is to use a powerful magnet to access the dried residual solid particles. Figure 2 is an analysis of the residue of a sample using an advanced cleanliness analysis system. Figure 3 provides an image and quantitative view of the three categories: metal particles, non-metallic impurities, and fibers. description.

Figure 2 Advanced Cleanliness Residue Analysis Instrument

Figure 3 Physical analysis of residue particles
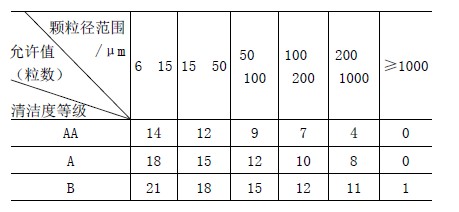
(3) The statistical analysis of the particle size of the solid particles in the workpiece residue refers to the distribution of the impurities after the test workpiece is cleaned according to the particle size in different intervals. The assessment form shown in the attached table, the rating can be set according to the actual situation.
Particle size statistical distribution monitoring example 
In the above example, the indicator is divided into three levels: AA, A, and B. However, in general, companies usually only set a pass threshold. In some cases, different weighting factors can be set for each particle size interval to cater for the product being inspected. Individual companies can then design test report formats that meet their needs and have the corresponding characteristics.
In recent years, many powertrain factories have upgraded the level of testing equipment when implementing some more demanding standards. From the high-intensity, low-efficiency manual work using ordinary optical microscopes, the cleanliness (granularity) analysis system shown in Fig. 3 was developed. This advanced instrument automatically scans all residue particles on the surface of the filter paper after cleaning through an electro-mechanical combined detection system. At the same time, it measures and counts the particle size and the specified classification interval, and finally according to the set threshold or different. The level determines the cleanliness indicator of the workpiece.
Effect of process factors on controlling product cleanliness
The basis for controlling the cleanliness of a product within its rated range is its production process. The facts show that the cleanliness of the control products is quite complicated due to the numerous and varied methods of manufacturing quality of the leading products. The determinant of a cleanliness level of a finished product is not just a simple cleaning process, but a comprehensive reflection of the entire process. Many measures that reflect both technological advancement and economic and manufacturing costs are often contrary to this goal. The impurities and residues generated by the crankshaft after the cleanliness test are mainly from three places: the rough surface of the non-machined surface - the processing surface of the sector plate, the oil hole and the journal, and many of the influencing factors.
Blank
Castings are more than forgings in crankshaft blanks, especially in medium and small displacement engines. The casting process adopted in China is mainly sand type, and the shell type is less used. Although the surface quality of the workpiece formed by the latter is obviously better than that of the former, the company tends to choose sand casting because of the high cost of the disposable shell process. Of course, a shot peening process can be added to improve the quality of the blank, but this will increase the manufacturing cost. Practice has shown that the manufacturing process of the blank and the surface quality of the formed workpiece have a great influence on the final cleanliness of the crankshaft. Some well-known foreign automakers have set cleanliness control values ​​for blanks of critical workpieces, such as 50mg of crankshaft blank residue. It should be pointed out that the blank manufacturing plant of aluminum parts is completely different, and the user will set a clear cleanliness threshold for the blanks of key aluminum parts such as cylinder heads, water pump casings and oil pumps. For some key parts such as cylinder head blanks, not only the weight of the residue, but also the requirements for particle size analysis are often further proposed. In this regard, even the domestic rough supply plant will be resolutely implemented.
2. Drilling - crankshaft oil hole machining
For a long time, the drilling process adopted for crankshaft oil hole processing at home and abroad is gun drill, but in recent years it has gradually changed to deep hole drill (such as carbide straight shank twist drill). In terms of manufacturing costs and ergonomics, the new process is much more reasonable. Therefore, since the beginning of the 21st century, the proportion of gun drilling technology in new production lines has been significantly reduced. This situation is at medium and small displacements. The engine production line is more obvious. On the other hand, since the micro-lubrication is carried out when the new process is performed, the high-pressure cutting oil is washed at a pressure of 80 MPa while being processed by the gun drilling process, and the latter method is undoubtedly used to remove the chips and other after drilling. The effect of the residue is much stronger than the previous one.
3. The influence of cutting fluid during grinding
The cutting fluid plays an important role in cooling, lubrication, cleaning and chip removal, and rust prevention, which is of great help to the normal processing. Production practice warns that as an integral part of the entire cutting system, the cutting fluid must be properly selected and used in order to function accordingly. In the case of grinding, for example, corundum grinding wheels have been widely used in the machining of shaft parts in the automotive industry. However, in recent years, as the requirements for manufacturing quality and production efficiency continue to increase, in grinding processes such as crankshaft journals. The proportion of CBN grinding wheels is increasing. Since the speed and load have been significantly improved at this time, the cutting fluid selected by some companies has also changed from the original water-based cutting fluid to the oil-based cutting fluid. Although the cleaning performance of the latter is improved when a high pressure supply is applied, in general, there is a large difference between the two compared to water-based cutting fluids containing a surfactant. On the one hand, the surfactant can adsorb various residues such as solid particles and sludge, and form an adsorption film on the surface of the workpiece to prevent particles and sludge from adhering to the workpiece and the grinding wheel (tool), and on the other hand, it can penetrate into the particles and At the oily and sticky interface, they are separated from the interface and carried away as the cutting fluid is carried away. Obviously, after changing the grinding method and cutting fluid, although the machining quality and productivity of the crankshaft can be effectively improved, the effects of cleaning and chip removal will be affected. Therefore, when planning and process adjustment, weigh various The pros and cons of process factors, gains and losses are still indispensable.
4. Cleaning station
The determination of the cleaning station in the production line has a great influence on the cleanliness of the product. In recent years, many manufacturers have cancelled intermediate cleaning stations and only have one production line terminal. Taking the crankshaft line as an example, some enterprises in the past have set up an intermediate cleaning after roughing (including drilling process) and heat treatment, but in recent years, such process layout has been very rare. This of course is also related to actual needs and economics.
In terms of cleaning fluid, similar to cutting fluid, cleaning fluid also has oil-based and water-based fractions. However, water-based cleaning fluids have occupied most of the long-term, but this situation has also changed in recent years. At the crankshaft line cleaning process, some engine plants have selected oil-based cleaning fluids. There is no doubt that it is like cutting oil used in machining, although this will help the rust prevention of the workpiece. However, the cleaning effect is certainly not as good as the water-based cleaning solution, and the intrinsic reason is exactly the same as the removal mechanism described above.
Conclusion
In summary, the importance and complexity of controlling product cleanliness can be clearly seen. In fact, it is not only the cleaning process that determines the final cleanliness level of the product, but the result of the overall process. Therefore, once cleanliness problems occur, or when faced with the need to improve cleanliness, comprehensive and item-by-item analysis must be performed.
Phlizon Foldable Led Grow Light
Shenzhen Phlizon Technology Co.,Ltd. , https://www.szledaquariumlighting.com