A typical direction in which visual inspection was first applied in industry is measurement. Visual measurement is a non-contact measurement. Its working principle is to collect the image of the different reflective effects of the structured light on the surface of the workpiece by the camera, and analyze the software to obtain the size information of the workpiece. This measurement method can be said to have a qualitative improvement compared with the contact measurement with a caliper, a micrometer, a plug gauge, a three-coordinate, etc., because it intuitively solves the core problem of three contact measurement without evading: workpiece deformation damage, The operational capability of personnel and the efficiency of simultaneous detection of multiple targets.
Many workpiece surfaces are highly polished. Slight tool contact measurements can cause damage to the surface of the workpiece. Many workpieces are deformed under slight external force due to material or structural factors, so there is basically no way to achieve high-precision measurement. Whether using measuring tools such as calipers, micrometers, etc., there are certain requirements for the use of these gauges for the measurement personnel. If the operation cannot be standardized, the error of the measurement itself will be generated, especially the gauges that require human readings. It will be bigger. Generally, the workpiece has multiple dimensions to be measured. If it is operated in a contact mode, since only one dimension can be measured at a time, this requires a lot of repetitive work during the measurement process, which greatly reduces the detection efficiency. .
Contact measurement Many limited problems affect the accuracy and efficiency of industrial measurements. Today, with the rapid development of industrial automation, how to minimize the impact of human factors on product quality stability is an issue that cannot be avoided by every manufacturing enterprise. The application of machine vision in the field of measurement is precisely solving these problems very effectively. Compatible with the automated production line, through the image processing method, the product is accurately and efficiently measured, sorted, and connected to the front and rear automation workstations to achieve a series of work from processing, testing, screening, positioning, assembly, packaging, storage, etc. Link.
At present, the production mode and production equipment status of domestic industrial manufacturing enterprises are uneven. Each enterprise has different measurement requirements for products at different production stages. Machine vision is currently measured by special station equipment or laboratory bench. The main products of the instrument. The laboratory benchtop measuring instruments are fixed standard products, can only be measured statically, and have fixed matching limits on the field of view. The station-based measuring devices on the production line are mostly based on the orientation detection requirements of different enterprises. The non-standardized custom development is highly targeted and can work dynamically. However, such equipment is often unable to continue to be used due to the upgrade or modification of the enterprise product, which will result in a relatively large waste of resources. Therefore, how to combine visual measurement and industrial automation standard equipment on the production line is an important problem to solve the problem.
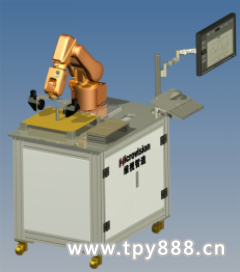
We know that the visual hardware used for machine vision measurement is mainly the combination mode of telecentric lens + parallel light source, because it can extract the contour of the image depth most accurately in the state of almost no distortion, and the precision result in the work process. It will not be affected by the bright and dark changes of the ambient light, the high frequency vibration of the production line, and the absence of positioning of the workpiece on the assembly line. Meeting these very realistic usage requirements in and of themselves illustrates the irreplaceability of this hardware combination. But why is this combination not well matched with the mature mechanical arm to achieve an ideal effect? The main reason is because the current telecentric lens and parallel light products are relatively large in size, mainly because of the long length, and the cylindrical contour is not good for clamping the positioning optical axis. If the optical axis is inconvenient to adjust, it will be very useful. Trouble. These reasons combine to make the flexible configuration of the robot + optical system in the production line unrealistic.


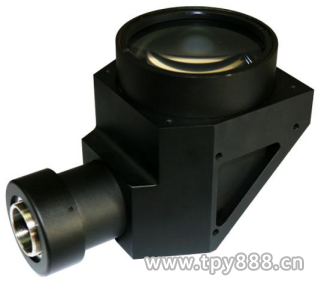
In response to this problem, BTOS made a targeted technological breakthrough in product development, and developed the BT-ZF series of dual telecentric lenses and parallel light source products, which are more than 50% longer than conventional telecentric products. Moreover, it can be installed in a variety of positions, only need to lock the screws, no need to make clamps or other mechanism positioning, the camera interface introduces a new idle mechanism, which is convenient to adjust the angle and direction of the image after the lens is installed, greatly optimizing the convenience of use. Sex.
Many workpiece surfaces are highly polished. Slight tool contact measurements can cause damage to the surface of the workpiece. Many workpieces are deformed under slight external force due to material or structural factors, so there is basically no way to achieve high-precision measurement. Whether using measuring tools such as calipers, micrometers, etc., there are certain requirements for the use of these gauges for the measurement personnel. If the operation cannot be standardized, the error of the measurement itself will be generated, especially the gauges that require human readings. It will be bigger. Generally, the workpiece has multiple dimensions to be measured. If it is operated in a contact mode, since only one dimension can be measured at a time, this requires a lot of repetitive work during the measurement process, which greatly reduces the detection efficiency. .
Contact measurement Many limited problems affect the accuracy and efficiency of industrial measurements. Today, with the rapid development of industrial automation, how to minimize the impact of human factors on product quality stability is an issue that cannot be avoided by every manufacturing enterprise. The application of machine vision in the field of measurement is precisely solving these problems very effectively. Compatible with the automated production line, through the image processing method, the product is accurately and efficiently measured, sorted, and connected to the front and rear automation workstations to achieve a series of work from processing, testing, screening, positioning, assembly, packaging, storage, etc. Link.
At present, the production mode and production equipment status of domestic industrial manufacturing enterprises are uneven. Each enterprise has different measurement requirements for products at different production stages. Machine vision is currently measured by special station equipment or laboratory bench. The main products of the instrument. The laboratory benchtop measuring instruments are fixed standard products, can only be measured statically, and have fixed matching limits on the field of view. The station-based measuring devices on the production line are mostly based on the orientation detection requirements of different enterprises. The non-standardized custom development is highly targeted and can work dynamically. However, such equipment is often unable to continue to be used due to the upgrade or modification of the enterprise product, which will result in a relatively large waste of resources. Therefore, how to combine visual measurement and industrial automation standard equipment on the production line is an important problem to solve the problem.
We know that the visual hardware used for machine vision measurement is mainly the combination mode of telecentric lens + parallel light source, because it can extract the contour of the image depth most accurately in the state of almost no distortion, and the precision result in the work process. It will not be affected by the bright and dark changes of the ambient light, the high frequency vibration of the production line, and the absence of positioning of the workpiece on the assembly line. Meeting these very realistic usage requirements in and of themselves illustrates the irreplaceability of this hardware combination. But why is this combination not well matched with the mature mechanical arm to achieve an ideal effect? The main reason is because the current telecentric lens and parallel light products are relatively large in size, mainly because of the long length, and the cylindrical contour is not good for clamping the positioning optical axis. If the optical axis is inconvenient to adjust, it will be very useful. Trouble. These reasons combine to make the flexible configuration of the robot + optical system in the production line unrealistic.


In response to this problem, BTOS made a targeted technological breakthrough in product development, and developed the BT-ZF series of dual telecentric lenses and parallel light source products, which are more than 50% longer than conventional telecentric products. Moreover, it can be installed in a variety of positions, only need to lock the screws, no need to make clamps or other mechanism positioning, the camera interface introduces a new idle mechanism, which is convenient to adjust the angle and direction of the image after the lens is installed, greatly optimizing the convenience of use. Sex.
Barbecue wire Grill Grate is made of high quality 304 stainless steel, never rusting and durable. BBQ Wire mesh does not have any coating or chemical ingredients, making food safer.
Multi-functional Grill Cooking Grid Grate: This wire mesh is mainly used for BBQ Grill Mat for outdoor cooking, it can also be used as a cooling and baking rack. Or you can develop other uses for it.
Cooking Grid
Shenzhen Lanejoy Technology Co.,LTD , https://www.compressionspring.net