The physical map shown in Figure 1 is an outsourced product processed by a factory in the internship teaching of our hospital. The name is the conveying screw shaft, which is a component of the material transported on a machine. The material is cast aluminum alloy. As a whole, it is a taper thread, and it is a left-handed thread, and the shape of the spiral groove is relatively complicated. The length of the spiral portion is 550 mm, the rigidity during processing is poor, and the amount of the snack knife is required to be low. The spiral groove structure is composed of three arcs. It is composed of a straight line segment and belongs to the special-shaped thread type, which cannot be processed on ordinary machine tools. Moreover, there is no thread machining code that can be directly quoted on the CNC lathe, so the difficulty lies in the programming of the program and the selection of the tool.
Processing program analysis
The programming idea of ​​CNC machining lies in the accurate description of the contour of the part. Therefore, the focus of this thread programming is how to accurately describe the shape of the spiral groove. Because there is no thread machining code that can be directly quoted, the G32 code is used for macro programming. (The R4mm arc is used as an example) to machine the part. as shown in picture 2.
It can be seen from Fig. 2 that the coordinates of the points on the R4mm arc are changed. How do you calculate them? Suppose we give the starting point A of a thread, then we can get the coordinate B of the center of R4mm (which can be considered as fixed). By analogy, the center coordinates C and D of R5mm and R25mm can be obtained. The drawing calculates the starting angle corresponding to R4mm, and uses the circle equation to calculate the coordinates of any point on the arc. For example, A point #3=COS[#1] *4 (#1 start angle, #3 represents X value), convert the circular coordinate system into the workpiece coordinate system. For example #3=COS[#1] *8+94.688 (diameter at the center of R4mm); A point Z value #2=SIN[#1]*4, after conversion #2=SIN[#1] *4-593.575 (R4mm center coordinates in the Z direction). The above is the coordinate calculation of the R4mm arc at the starting point, and then the corresponding end point coordinates are calculated, and the start point and the end point are connected by the G32 command. Then complete the R4mm macro programming, the program is as follows:
......
For more information, please download the attachment or view Metalworking (Cold Processing), Issue 23, 2013:
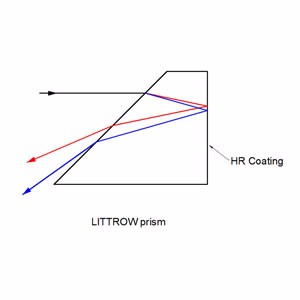
Littrow prisms feature 30°, 60°, and 90° angles .30° - 60° - 90° Littrow Dispersion Prisms can be used for a variety of applications. Uncoated littrow dipersion prisms are used to disperse light into its component spectrum. Coated littrow dipersion prisms are used to deviate the line of sight by 60°.
Dispersion Prisms (Uncoated)
Collimated white light enters into the A-C surface of the prism, is reflected at the hypotenuse surface, and then dispersed into its component spectrum at the B-C surface. Although Littrow prisms produce narrower dispersion than equilateral prisms, Littrow prisms are typically less expensive.
Beam Deviation Prisms (Coated)
Incident light enters into the aluminum coated B-C surface of the prism at the nominal angle and returns back using the same path. In spectrum dispersion applications utilizing white light, the resolution performance of Littrow prisms is equal to equilateral prisms since the optical path length through the glass substrate is the same distance round-trip. Additionally, light entered into the A-C surface will reflect twice inside the glass substrate before being emitted through the hypotenuse surface at 60°.

Dispersion Prism,Optical Dispersion Prisms,Beam Deviation Prisms,Inked Dispersion Prism
China Star Optics Technology Co.,Ltd. , https://www.opticsrealpoo.com